
Making Gorgeous DIY Easter Greeting Card with Your Kids
Easter is so much more than a holiday—it’s an excellent reason to hang with your kiddo, get crafty and share a little happiness. And of course, what better way to spend time with your kids during this special holiday than to make Easter greeting card together? They are simple, fun and unique!
Whether you’re a parent looking for meaningful activities or a crafter in need of an idea, we’ve got you covered. Short on time? Don’t worry we’ve included free printables to make it even easier!
Why DIY Easter Greeting Card?
Store bought cards may save time but they can’t compare to the charm and meaning of homemade ones. Here’s the reason why making the Easter Greeting Card yourself an excellent idea that the entire family will enjoy:
A Personal Touch: Handmade cards stand out because they’re personal and unique. No store bought card can deliver the same level of thought.
Quality Time: Crafting is not only fun, but also a great way to spend screen free time with your kids.
Encourages Creativity: This project allows your child to exercise their imagination and practice their fine motor skills with their hands.
Keepsake Treasures: Unlike generic store made cards, these are keepsakes—sentiments to be treasured long after Easter is over.
Why not get your craft supplies out, roll up your sleeves and start a new Easter tradition with your kids? With this activity you’ll make more than cards—you’ll make memories.
What You’ll Need For Easter Greeting Card
Before you start, gather these simple supplies—all at home or at your local craft store:
- Colored paper (white, pink, orange, green)
- A black marker
- Pencil
- Scissors
- Glue stick
- Creativity and enthusiasm!
Bonus: Download our free printables for bunny faces, ears, carrots, and leaves—perfectly designed for this project. Visit Craftifybud.com for instant access.

6 Fun and Simple Steps to Create Easter Greeting Card
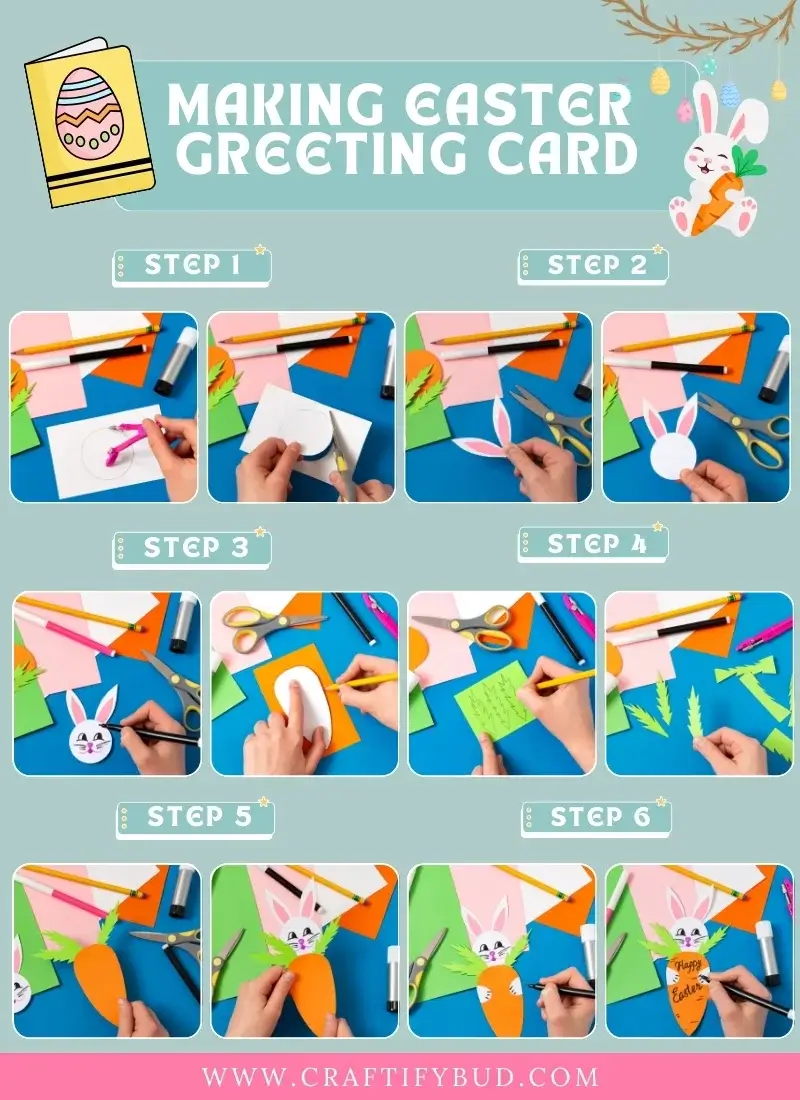
Step 1: Shape the Bunny Face
Start with white paper. Draw a circle to make your bunny’s face. Can’t draw perfect circles? Use a bowl or plate as a stencil. Use scissors and cut it out carefully.(Tip for parents—sharp scissors are easier to use but always supervise little ones.)
Step 2: Craft the Bunny Ears
Using white paper, cut two long ear shapes. Take pink papers and cut tiny pieces for the ears’ inner parts..Glue the pink cutouts onto the white ones and attach them to your bunny face. Watch your bunny come to life!
Step 3: Give Your Bunny a Face
Add two circular eyes, a triangle nose and a cheeky smile with a black marker. To take it to the next level, draw on whiskers and rosy cheeks with pink paper or blush, or get creative with expressions — a winking bunny, perhaps?
Step 4: Design the Carrot Base
Take orange paper and draw a carrot shape large enough to frame the bunny face. Once done, cut it out. To give the carrot dimension, cut out a smaller circle to act as a pocket for the bunny. Attach this to the carrot base using glue, but keep the top edge open so the bunny’s face can slide in and out!
Step 5: Add Green Leaves
From green paper, cut out leafy shapes to attach to the top of your carrot. Glue them in place to add that final, realistic touch!
Step 6: Make It Personal
The kids can get creative here! Write “Happy Easter!” or a nice message on the carrot.
Add glitter, stickers, ribbons or a fuzzy pom-pom tail for the bunny. Leave to dry before giving.
Time-Saving Bonus—Free Printables
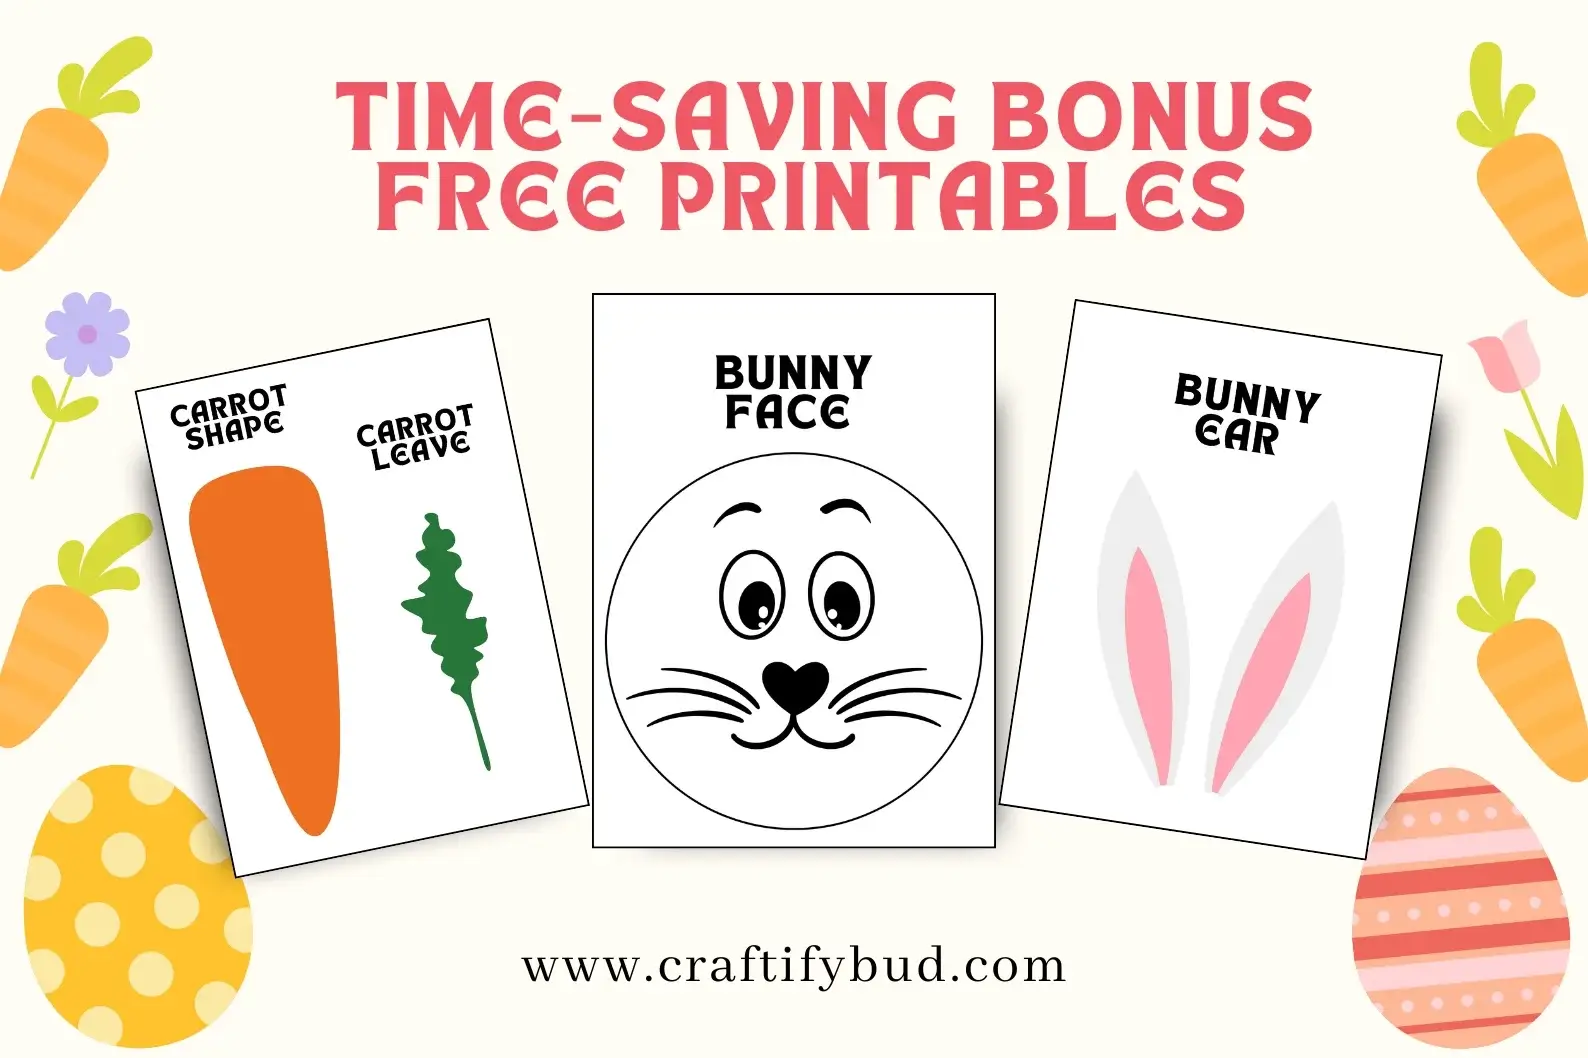
Running short on time? Use our free templates to fast-track the creative process. Download and print designs for bunny faces, carrot shapes, and leaves directly from our website. Perfect for ensuring crisp lines and accurate sizing!
Pro Tips for Crafting Success
- Set Up a Craft Station
Cover your work area with newspaper or an old tablecloth to keep things tidy. Keep materials within reach for smooth crafting sessions.
2. Get Creative
While the guide offers a structured approach, encourage your kids to experiment with colors, patterns, and designs. Creativity has no limits!
3. Reuse Supplies
Use leftover paper or miscellaneous crafting materials you already have. You’d be surprised how that old glitter jar or box of stickers can come in handy.
4.Capture the Moment
Take photos of your kids’ final creations and share them on social media. Don’t forget to tag #CraftifyBud so we can celebrate your masterpieces too!
Create Joyful, Memorable Moments This Easter
It’s not all about designs when you’re making Easter greeting cards; it’s about the fun that you have when you do those together with your kids. Whether they are on display or a surprise in Easter baskets, they will make someone smile.
Get started today with your crafting and share all the Easter joy by sending customized greetings.For even more ideas and templates, check out Craftifybud.com.
Happy crafting and Happy Easter! 🌷